Learnings from poorly implemented sites

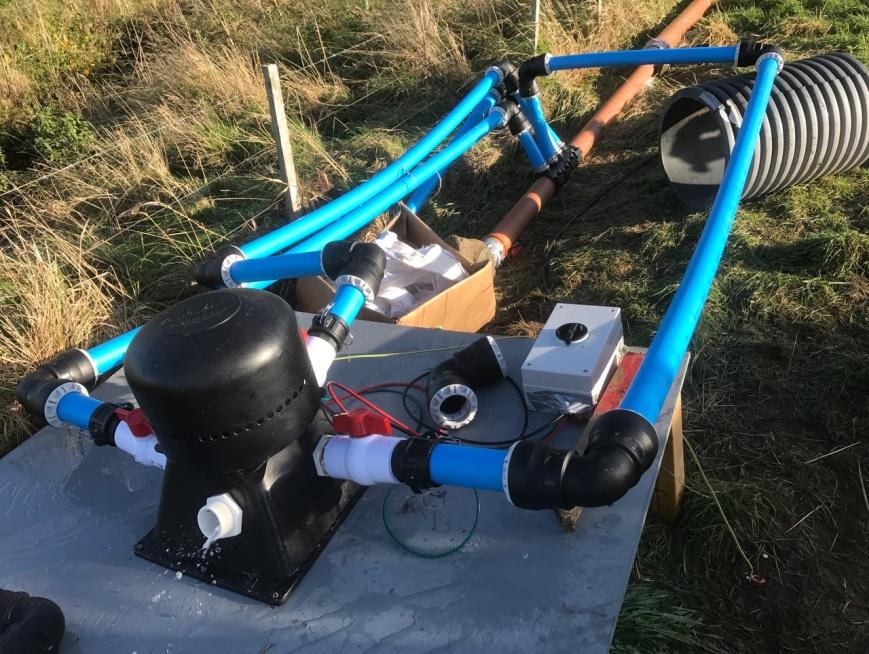
I occasionally get sent pictures of poorly installed PowerSpout turbines as part of a complaint about lower than expected performance. The pictures often reveal the reasons. This example was eventually installed correctly, but it would have been much more cost effective for all concerned if it had been installed correctly the first time.
TRG complaint about low performance
Main issues observed from photo above:
- Blue PE pipe used is not as per our advice (we advise 50mm flexible pipes)
- The elbows in the blue pipe have very high losses due to their small ID and 90 degree angle
- Weight of these unsupported pipes has misaligned the jet so they miss the turgo rotor
- The DC switch is not in a waterproof enclosure
- No pressure gauge was fitted
Some changes were made as can be seen below:

This is better but still some room for improvement.
- Excessively long hose pipe used - keep them as short as possible
- The DC switch is still not in a waterproof enclosure
- No pressure gauge fitted yet – but almost !
Pipe supports have now been fitted to prevent the pipes distorting the turbine casing. But the correct jet alignment is not easy to find once the casing has been distorted (due to weight of pipes in previous picture). It is important to support the pipes when first installing them, but clients often forget in their eagerness to turn it on.
Staff in our factory use a jig to obtain perfect jet alignment. This is done by heat setting the case material around each jet holder. The jig is a 1mm wire that is held centrally in the jet holder but can be moved in and out. Jet positions are heat set until all jets align perfectly. This is how our turbines are supplied.
Problems frequently arise when the pipework is not supported prior to filling with water, as the extra weight can distort the set that we put in the casing. Small distortions may spring back. Armed with a heat gun larger distortions can also be fixed. Otherwise some force may be needed to achieve the optimum jet angle and maximum performance.
PLT complaint about leaks

At first glance this 2.4kW twin PLT install looks tidy, until you look a little closer.
There is water leaking over the floor. The DIY installer/owner complained that:
- Water was leaking from between ball valves and the plastic case
- The clear screen was leaking
- The base was leaking despite many attempts with silicon sealer to stop these leaks
My reply (not to the client but to the dealer who sold it - in the same order) was as follows:
- The jet sleeves are not fitted correctly which is why they leak, he has installed them on the outside of the case and they go on the inside – refer to install manual for detailed advice.
- The toggle latches have not been fitted to the screens, so these will leak, the latches were in the box – refer to install manual for detailed advice.
- Silicon is no good, use neoprene foam to make a good seal– refer to install manual for detailed advice.
My other general comments were:
- No pressure gauges have been fitted - two were supplied.
- I advised auto grease cans should be fitted as running at 1200W each, these have not been fitted
- Have the turbine bearings been greased?
- Manifold used looks to be one pipe size smaller than we would normally advise.
- I would have allowed more space between the turbines to make servicing easier, he seems to have more space, why did he not use it? To align with an existing sump maybe?
- Is the vent/drain hole in the PMA rear case able to drain through the steel sheet - if not fix it.
- I would also earth the metal plate, as the turbine can be LV in certain situations.
The client had been asked if he had read and followed the installation manual, he said he had but the pictures tell another story.
We had been advised the site had a 37m head which would mean our turbines would do over 1.7kW, but in the end the site must have had more head (not measured as pressure gauges supplied were not installed) as they got 2.4kW on the Midnite Classic 250V MPPT.
This was a client who originally had a DIY turbine (shown below) using a car type alternator.

The client was no doubt very proud of his turbine that had run for many years and many brush changes - one set every year. This turbine never put out more the 1.2kW and ran most of the time at 600W. On the same site our PLT’s put out 2.4kW.
There is more to this story though. Before the install was done we got this email from the dealer:
I supplied the client the turbines and he paid he bill.......today he calls me and he is concerned about the silt/sand in the pipe and that it will eat out the jets. He said that the old turbines has brass jets and now he wants to return the turbines and buy a 48volt alternator with internal regulator.
The DIY client after having two turbines specially made for his site wanted to send them back as he felt be could do a better job himself.
When we said no, the client sent this list of demands.
- The plastic units, including the jets and Pelton wheels will outlast the current metal one (25 Years to date with bearing replacements only every two years and brushes replaced every year for jets see 5 below)
- And he guarantees to replace jets at or below the cost of the current brass ones.
- And he guarantees we will get 800watts continuous output per turbine (assuming we have the water volume)
- And he preapproves the installation so there is no come back in that he claims it’s an installation problem
- And he accepts that we are in an environment that on occasions (whenever we get heavy rain) results in high levels of sand (something that was made clear from the very beginning) which has not proved to be a problem for the current Pelton wheel except that it has worn the tops of the jets (replaced once circa 10 years ago and due for replacement again now, i.e. three sets of jets in twenty five years which are just a standard off-the-shelf brass plumbing fitting.)
We just referred him (via the dealer) to the pages in the relevant documentation including our warranty document that very clearly sets out our terms.
The last email from the dealer was
Thanks for your answer, I have emailed this through and I spoke to him yesterday and explained that he really does need to read the manual, sort the issues and send picture to obtain the warranty.
No pictures have been sent to us yet, which means that the product warranty will expire soon (1 year limit from date of sale). He has not yet sent us proof that the installation errors have been fixed to get the 3 year extended warranty - but he knows all this as he says he has read our documentation.